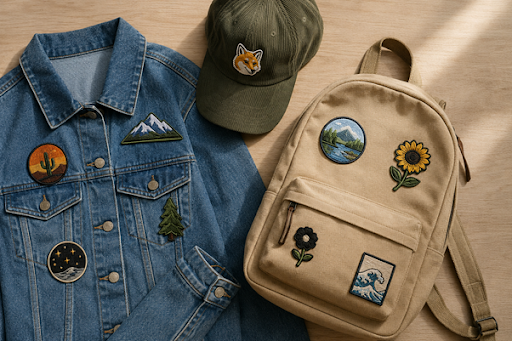
Patches used to mean one thing: covering a hole. Now they’re doing something different. People use them to mark a trip, show support for a team, or just make a plain jacket look like theirs. The difference between a patch that looks planned and one that looks like an afterthought usually comes down to a few small choices.
This isn’t about picking any patch and hoping it works. It’s about knowing which patch fits which item, where to place it, and why some materials hold up better than others. If you’re about to add patches to a jacket, hat, or backpack, here’s what actually makes a difference.
Pick The Patch Style Before You Pick The Design
Most people choose a patch design first and figure out the rest later. That order causes problems. The fabric you’re working with decides what will actually sit right and last.
Denim is thick and holds up well under embroidered patches, since the stitching has something solid to grip. Wool and knitwear need something lighter and flatter, so a woven patch works better than a thick embroidered one. Canvas bags and backpacks can handle almost anything, including PVC patches, since the material is stiff enough to support the weight without sagging or curling at the edges.
Start with the fabric. The design decision gets easier once you know what the material can actually hold.
Jackets Work Best With A Mix Of Sizes And Placements
Jackets can carry more patches than any other item on this list, and they don’t need to match. Denim, bomber, and military-style jackets are built for layering patches of different sizes across the chest, sleeves, or back without looking cluttered. The mismatch is part of what makes it work.
Sewing patches on is the better choice for jackets you’ll wear often, since stitching holds up through washing and daily wear far longer than iron-on backing, which tends to lift at the corners over time. Some people build a jacket around a specific theme, like travel stamps or band logos, while others go with Irish patches to reflect where they’re from or a place that means something to them.
There’s no fixed rule for how many patches are too many on a jacket. The only real guideline is placement that looks deliberate, not random.
Hats Need Fewer Patches
A cap has less room to work with than a jacket, so one or two patches is usually the limit. Front-and-centre placement works for a single patch, while two patches look better split between the front and one side. Anything more starts to compete for space on a curved surface that isn’t built for it.
Material matters most
Hats deal with more wear than jackets do. Rain, sun, and constant handling wear down a patch faster, so the material needs to hold up on its own, not just look good on day one. This is why some people get custom hat patches in Ireland made specifically for headwear, since hat-specific patches are cut and backed differently than patches made for jackets or bags.
Getting the fit right
A patch that’s slightly undersized for the cap panel will sit better than one that overlaps the seams.
Backpacks Are Easy To Start With
Backpacks give you the most room to experiment. The panels are flat, which means less pressure on the stitching, and mistakes are easy to fix without ruining the bag. If you’re adding patches for the first time, this is the item to practice on.
Where they last
- Front pocket: holds patches well since it’s flat and gets handled the least
- Top flap: works fine for lighter patches, but heavier ones can pull at the stitching over time
- Side straps: patches here peel faster, since straps bend and rub against your body or a chair
Where to begin
Start with the front pocket if you’re unsure. It’s the safest spot to test placement before committing to anything permanent.
Hoodies Need A Lighter Patch
Hoodie fabric is thinner and stretches more than denim or canvas, so it reacts differently to patches. Heavy embroidery has a lot of thread density, and on stretch fabric that weight can pucker the material around the edges once it’s washed a few times.
Why woven works better
Woven patches are flatter and thinner than embroidered ones, since the design is woven directly into the fabric instead of stitched on top of it. This makes them flex with the hoodie instead of fighting against it, which is why woven patches hooded sweatshirt combinations tend to hold their shape and stay flat wash after wash.
Placement to avoid
Skip the hood seam and drawstring area. Both spots move constantly, and a patch placed too close to either will loosen faster than one placed on a flat section of the chest or sleeve.
Placement Decides The Look
Where a patch sits changes how noticeable it is, and that matters as much as the design itself.
Chest, sleeve, or back
A chest patch is the first thing people notice, so it works best for a design you want front and centre. Sleeve placement is quieter and reads as more of a personal detail than a statement. Back placement is the boldest option, since it takes up the most space and is visible from a distance.
Grid or scattered
A grid layout, with patches spaced evenly, looks planned and put together. A scattered layout looks like it built up naturally over time, which works well if you’re adding patches gradually instead of all at once.
A Quick Material Comparison
Here’s a quick breakdown to help you decide before buying, based on what each material actually holds up best against.
| Patch type | Best for | Durability |
| Embroidered | Jackets, jeans | High, thick stitching |
| Woven | Hoodies, thin fabric | High, flatter finish |
| PVC | Bags, outdoor gear | Very high, weatherproof |
| Iron-on | Quick/light use | Moderate, can peel |
If you’re only adding one or two patches for now, iron-on is fine. For anything you plan to keep long-term, sewing on embroidered, woven, or PVC will hold up far better.
Common Mistakes That Shorten A Patch’s Life
A few small errors cause most patches to fall off early, and they’re easy to avoid once you know what to check.
Wrong adhesive for the fabric
Not every iron-on backing works on every material. Using a strong adhesive on thin or stretchy fabric can damage the fabric itself, while a weak adhesive on thick fabric like denim won’t hold at all.
Skipping edge stitching
High-friction spots, like backpack straps or pockets that get grabbed often, need a line of stitching around the edges. Without it, the corners lift first, then the whole patch follows.
Ironing on stretch fabric
Heat and stretch fabric don’t mix well. Ironing a patch onto hoodie material or anything with spandex can warp the fabric around the patch permanently.
FAQs
Is it better to sew or iron-on a patch?
Sewing holds up longer, especially on items you wear or use often, since stitching doesn’t loosen with heat or repeated washing. Iron-on works fine for quick, short-term use, but the adhesive weakens over time and the edges usually lift first.
How do I keep a patch from falling off?
Turn the item inside out before washing, use cold water, and skip the high-heat dryer setting. If you’ve ironed a patch on, adding a line of stitching around the edges afterwards makes it last through far more washes.
Can custom patches be washed?
Yes, most patches handle regular washing fine once they’re properly attached. Sewn patches hold up best under normal wash cycles, while iron-on patches should be washed inside out in cold water to avoid loosening the adhesive.
What’s the best glue for patches?
For fabric-to-fabric use, a washable fabric glue made for clothing works better than hot glue, which turns brittle and cracks with movement. Fabric glue stays flexible, so it holds up better on items that bend or stretch during regular use.
Why do backpacks have a diamond-shaped patch?
That diamond shape near the bottom of many backpacks isn’t decorative. It’s a lash tab, originally used by hikers to thread gear like an ice axe or trekking poles through it, though today it’s mostly kept as a design detail.
Start With One Item
Pick one piece first, whether it’s a jacket, a hat, a backpack, or a hoodie, and get the placement and material right before moving on to the next. Trying to patch everything at once usually means rushing decisions that are easy to get right when you slow down.
The fabric and the wear the item gets should guide most of your choices. Once you’ve done one piece well, the next one gets easier, since you’ll already know what to look for.









+ There are no comments
Add yours